Showing posts with label Skills. Show all posts

Sunday, February 2, 2014

Absolute Beginners: Fortune Favors the Prepared

A bicycle helmet saved my life.

This helmet:
Figure A: This is the Helmet
I was doing my ordinary ride: Bear's house to the Nimbus Fish Hatchery on the American River Bike Trail. Usually that ride is 2 hours and 33 miles. On Friday, it turned into a 12 mile one-way ride. You can click the link or the web widget, below. The route ends, essentially, where I crashed.

Actually, I'm totally guessing that I crashed, because I don't remember the 5 minutes before the route ends, or the 10 minutes following. I can only surmise that I crashed because my face was battered and bloody:

Figure B: My Bloody Face
The next thing I remember is hearing someone telling me that I couldn't get back on my bike. I can't see the person in my remembering, but I can hear him. The next thing I remember after that was being helped to a nearby road by two nice guys who ended up being paramedics (not there on official business but getting in some exercise). They wisely asked me to sit and call Davey to come get me. Davey came and took me home.
Here, I'd like to give a serious shout out to the two fine gentlemen who assisted me. At the time, I didn't have the capacity to get their names, but one of them named Conner wisely took my number. I know he's gonna read this, so: THANK YOU CONNER! Its the spirit of sportsmanship that keeps my faith in humanity alive!
Now the question is: what happened? Well, looking at the map, I know I was in the midst of a turn on a bend in the trail — a turn I've taken many times in the past. I was going about 15 miles per hour on a turn I usually take at around 17. It had just rained, so the roadway appeared damp, but not wet. It was about 54º F, so it couldn't have been icy.

Still, somehow I managed to end up on my face, needing assistance.

The more I think about it, the more the pattern of damage leads me to the conclusion that my wheels slipped out from under me because of slick conditions. My face was damaged on the side I would have been leaning. The chain of events I surmise are as follows:

  1. I entered the turn without braking and steering appropriately (thrusting out with the outside leg) as I usually do. (Evidence: my habit.)
  2. My wheels hydroplaned on the newly-wet surface. (Evidence: my observation and the recent rainfall.)
  3. I tumbled forward onto the pavement and hit the corner of my helmet hard. (Evidence: The helmet was damaged in only one spot. (See Figure A, green circle.))
  4. The helmet bore the brunt of the impact, even though the styrofoam doesn't appear deformed. (Evidence: the helmet must have hit first as it is the only damage showing slide marks; the contusion under the helmet is the least of the wounds, and was nearly healed the day after the accident. (See Figure B, green circle.))
  5. I slide forward onto my face after the helmet did its job. (Evidence: the wear marks on the helmet show sliding, but my face doesn't show slide marks.)
  6. My bike fell away in the opposite direction and landed with little slide. (Evidence: the bike showed only very minor damage to the right shifter.)

Had I not been wearing a helmet, I surely would have had a much more traumatic blow to the head. The moral of the story is: WEAR YOUR HELMET! I've blogged about this before: helmets save lives!

I'm not going to proselytize but if I see you riding without your helmet on, I'm going to point at you and laugh. So be prepared.

If you found this article useful, please consider a donation of $5 or more to my AIDS/LifeCycle ride. Click "DONATE," above.

Love,
Your Bear

PS: should look at the end of the ride, you can see where I impact...my speed goes from 15 mph to 9:


Over the next couple months, I'm going to write a few articles with the lead-in title "Absolute Beginners," explaining some of the basic principles of cycling. Most of the information is stuff I've learned from other cyclists, bike shop mechanics, classes I've taken, and Google searches. Please help me out and comment with corrections, additions, or supplements which will help my readers learn about how to operate their bikes!

Monday, January 6, 2014

Absolute Beginners: Ten Rules for a Civil Ride

In cycling, etiquette means safety. For the AIDS/LifeCycle, the rules are laid out in the infamous Safety Speech. Other organized rides have similar rules to guide civility, for instance see the rules at ms150. Other sets of rules are available, such as the over-wrought (tongue-in-cheek?) Rules of the Velominati.

But the rules are only as useful as your preparation before your ride or your ability to recall them at key junctures. So, I've paired them all down to ten.
Image Credit: Cannondale Facebook group.
Thanks, André.
  1. Wear your helmet at all times. (Safety is an etiquette issue because unsafe riding may interfere with another cyclist's ride.)
  2. Dress appropriately. (Inappropriate dress — non cycling clothing which cannot be layered for weather — can delay or end rides. Wearing a team kit you did not earn is just rude.)
  3. Maintain your bicycle. (Poorly maintained bikes are prone to mechanical issues and are just plain ugly to look at.)
  4. Obey traffic rules. (Bicycles are vehicles under the California vehicle code. You can and will get a ticket.)
  5. Ride predictably. (Pay attention to traffic and other cyclists. Maintain a straight line; don't bob and weave. Pass only on the left. Look behind you before passing.)
  6. Announce your intentions. (Use hand signals. Call out: "Behind you." "On your left." "Debris in the road." "Stopping." "Slowing." — in a loud, outside voice. These work to keep other cyclists safe and riding.)
  7. Be self-sufficient, but accept aid when needed. (Learn how to change your flat and keep a tube and pump on you while riding. But accept help from a more-skilled cyclist to speed a return to the road. Ask if you have trouble.)
  8. Stay hydrated and well-fed. (Nothing destroys a ride — both for the rider and his mates — faster or more completely than a bonk.)
  9. Help stranded riders appropriately. (Ask as you pass. If the rider indicates he needs help, stop. If you cannot help, say so. If you can, do it quickly and politely.)
  10. Not all riders have the same skills. (When passing, say "hi" or "good morning." This will mitigate bad feelings. When being passed, don't let your feelings of inadequacy guide you — if the passer was acting safely, there's nothing wrong with it.)
And now for the corollaries:
  • Own your own safety, don't rely on others. (Thus, riders in pelotons are individually responsible for knowing if its safe to pass. Relying on another rider's call out "CLEAR," is unsafe, so check for oncoming traffic yourself.)
  • Be fastidious about safety and the rules. (Your actions will lead others to act safely, too.)
  • Don't upbraid other cyclists while on the bike. (This only leads to hurt feelings. Instead, if you see them at a rest stop, gently point out how they might have acted more safely.)
  • Be polite and smile. (Its easy to be rude, its really hard to smile and use kind words when you feel superior or belittled. Learn how to do it.)
  • Propagate these rules. (If you have a blog or Facebook page, post these rules or your own rules often. Hold your riding mates to these standards.)
My friend asked: "who gets to decide what is civil behavior for a cyclist?" To complete this post, I considered three principles. First, cyclists must obey the law — disobeying the law leads to uncivil and unsafe riding. Second, cyclists should not engage in unsafe behavior, even if it is technically legal; doing so will impact other cyclists negatively. Third, cyclists should act in a way which supports other cyclists, whatever their skill level. Sometimes that means cheering on faster cyclists as they pass, or cheering on slower cyclists as they exceed their goals.

Love,
Your Bear

Over the next couple months, I'm going to write a few articles with the lead-in title "Absolute Beginners," explaining some of the basic principles of cycling. Most of the information is stuff I've learned from other cyclists, bike shop mechanics, classes I've taken, and Google searches. Please help me out and comment with corrections, additions, or supplements which will help my readers learn about how to operate their bikes!

Sunday, November 17, 2013

Kindness of Friends and Strangers

Many a ride is interrupted by seemingly intractable mechanical problems. When those mechanical problems occur near your house or a bike shop, they can be easy to fix. When you're in the middle of nowhere or you're in unfamiliar territory, a mechanical problem can seem intractable and make you utterly demoralized. But its also at these times you can learn about the cycling community.

My chain wedged between
the cassette and hub
On Saturday, 15 minutes into an AIDS/LifeCycle training ride, my chain popped off the top ring of the cassette and wedged itself into the gap between the cassette and the hub. Fortunately, this happened just as I was stopping. I was one of only two Training Ride Leaders on the ride, and so the ride couldn't go on without me. I was sweep (the TRL at the end who makes sure all the others complete the ride), so everyone was ahead of me. When I looked down, I saw immediately what had happened, but did not absorb the enormity of it.

I've not ever had a chain slip on this bike, so I wasn't sure if the symptoms were typical. the chain was wedged in, so I couldn't spin the rear tire. I had to carry my bike to a safe place. A few seconds of tugging made me realize that I wasn't going to be able to pull it out without loosening the cassette (a task accomplished with a chain whip — not the sort of equipment you usually carry on a ride). But the severe nature of the problem was also sinking in: had this happened when I was moving faster, I might have crashed.

I tried calling the other riders, but since they were riding, they didn't answer. So I started to search maps for local bike shops. Since the area was new to me, the bike shops seemed insurmountably far away. But just as I began to call a cab to get me there, CJ pulled up, having turned around from the ride. He looked at the problem and agreed it needed a bike shop. Then the other ride leader, Craig and a rider, Celeste — both local to the area — came to see what I needed.

William helping CJ with an
emergency tire repair
Celeste offered to get her car and take me to the bike shop. I didn't refuse! So, about 30 minutes later, we were on our way to the bike shop.

She took me to Elk Grove Cyclery which was about 2.5 miles from where I broke down. After only a few minutes of tinkering, the mechanic diagnosed both how to remove the chain and why the chain had slipped in the first place.

He told me that the cassette had been wrongly installed — there was one too many spacers between the cassette and the hub. Also, because the cassette and wheel were not the originals for this bike, the rear derailleur was slightly out of adjustment. Now the spacer is like a couple millimeters thick. And he showed me how off the derailleur was — also a couple millimeters. The total couldn't have been more than a few millimeters. But that is enough to push the chain off the top side of the cassette!

At this explanation, I sheepishly admitted that I had installed the wheel and the cassette. What was astonishing was that I'd been riding with the poorly-installed cassette for nearly eight months without incident. The mechanic showed me how to fix the derailleur and how to tell if you have too many spacers. Then, he charged me only $15 for the repair and derailleur adjustment! Sadly, I didn't have any cash for a tip. But if you go to Elk Grove, stop in at Elk Grove Cyclery!

And this is one of my favorite things about cycling. You're never alone on the road. Your mates care, bicycle mechanics usually love their job and they care, too. But when you get a flat and you're spare is also flat, you'll find that passing cyclist will be thrilled to help if you ask.

The other moral of the story is that I need to get my work check carefully by a mechanic in the future!

Love,
Your Bear

Tuesday, November 5, 2013

Absolute Beginners: Relearning Steering

When we first learned to ride bikes as children, the two most trying ideas were remaining upright and steering. Balance came quickly, and with it a gut instinct about how to steer. Once dad took the training wheels off and we were darting up to the neighbor's house (without a helmet, gloves, or a clear sense of which side of the street was correct), who knew that any more needed to be learnt?

As adults taking up the sport, that question may return: I know how to ride a bike, why should I think about steering? The answer is that making a few conscious changes in the way you handle your bike will make your rides safer, faster, and more enjoyable.

I wrote an extensive piece on cornering; The steps are outlined in the post, but I repeat them in brief here for convenience:
Look into the turn. Choose a line for the widest-possible but safest turn. Gauge your speed and brake before entering the turn. Lower your outside foot and press down, driving your foot toward the ground. As needed, apply gentle pressure forward to the inside handlebar. If you're riding too fast, lean into the turn to keep your line.
In this post, I want to emphasize: focus on controlling your bike with your foot by driving it down toward the ground.

Figure 1: Eyes up and looking at the exit to the turn. Original Image Credit.
Generally, counter-steering is accomplished by getting your bike to lean in the direction of travel. Motorcyclists accomplish this by gentle pressure on the inside handlebar and by actively leaning into the turn. While you can do the same thing on a bicycle, that technique can make cyclists feel wobbly and cause unnecessarily and too-early braking.

Instead, as I learned at the Savvy Bike 201 Clinic, focusing on driving your foot down rather than pressing on the handlebar keeps your center of gravity over the bike making you feel much more stable and in control of the turn.

This is not an easy technique to master, even once you've figured out how to accomplish it. That's why its important to think about the steps and practice them consciously on each ride: train yourself out of habit, and into proper form. Here's a nice video demonstration of the technique.


There's so much more to discuss. How to choose your line? Why not brake in the turn? When to lean your body? I'll address each of these in future posts.

As always, please leave your notes, corrections, or suggestions in the comments!

Love,
Your Bear

Over the next couple months, I'm going to write a few articles with the lead-in title "Absolute Beginners," explaining some of the basic principles of cycling. Most of the information is stuff I've learned from other cyclists, bike shop mechanics, classes I've taken, and Google searches. Please help me out and comment with corrections, additions, or supplements which will help my readers learn about how to operate their bikes!

Monday, October 28, 2013

Absolute Beginners: You want me to wear what? Spandex!

New cyclists often complain about cycling clothing, refusing to wear it: It's expensive and pretty much useless for anything else. Its ugly. Its not flattering. It exposes my junk. After a while, it smells. It makes me look like a dork.

All valid, criticisms but in the end, even vociferous spandex naysayers will, eventually, wear cycling clothing. Why? Because it is supremely functional for long distance riding.


Here are a few reasons:

1. Tight fitting clothing doesn't bunch up and cause sores.

All cyclists eventually get "saddle sores," or skin irritation in the crease between the buttock and the thigh. Though there are many causes of saddle sores, one cause is poorly fitting bike shorts, or bike shorts with stitching in the wrong place. The folds of fabric or stitching can rub the skin, causing it to become raw, then native bacteria can infect it, causing angry, itching sores which make riding unpleasant.

To avoid saddle sores, begin by keeping a smooth layer between your buttocks and the saddle. Experiment with lubricants: vaseline (which is thick and so works well, but is difficult to remove from the cycling pad), chamois butter, or even silicone-based lubricants, or none at all.


2. Cycling shorts have the padding you're missing from the saddle.

In my entry on cycling seats, I recommended the smaller, compact saddles used frequently by cyclists. Such saddles help avoid saddle sores, are lighter, and allow free leg movement. But you still don't want your sit bones resting on a hard surface. So where does the padding go? In the cycling shorts, of course! And that is why those pads are in there.
Thor Hushovd. Image Credit

3. Cycling clothing is purposefully light weight and fast drying.

A pair of cotton shorts can weigh about a pound, but a typical bike outfit can weigh much less than a pound! The less you have to push up that hill, the more achievable it is.

Cycling involves sweat. Lots of it. But it also involves varied environmental conditions. Unless that sweat can escape, its going to build up in your clothing, weighing you down, causing to to overheat while exercising and to get chilled when at rest, and its going to start to stink. But cycling clothing is designed to dry quickly even while exercising, minimizing the build up of moisture. And being dry is so important while riding!

4. Many styles of cycling clothing are convertible.

Rides are often long. They can take from 2 hours for a 30 mile ride to 8 hours for a 100 mile ride. Thus, rides often start early in the morning when its cold and damp. The sun rises and so do the temperatures. Or the ride up hill is sunny and hot, while the descent is cold and shaded. Or half way through a lovely ride, the wind kicks up and it starts to drizzle.

So, for every ride, you need to be prepared for multiple riding conditions. Cycling clothing can help. For instance, you can purchase extremely light-weight Goretex jackets which block the wind and keep you surprisingly warm, but which can pack up small enough to fit into your jersey pocket. You can purchase insulated cycling sleeves and leggings which can be pulled up or down while you're riding.

There's a good outfit for every condition. Check the weather and be prepared.

5. Layering adds warmth without significant weight.

If you know that its going to be a cold day, you may be tempted to don a thick sweater, down jacket, or other rain coat. But if properly layered, cycling clothing can achieve comparable warmth without the bulk.

On cold days, I typically wear a base layer (often lycra or wool) under my jersey. Sleeves of various insulation depending on the forecast. A jersey. A Goretex jacket — I have a very thin one and an insulated one — depending. Cycling shorts, also of varying insulation. Gloves of various insulation levels (or two pair of gloves woolen under fingerless). And insulated leggings. I can take things on or off as needed.

On my feet on cold days, I'll wear woolen socks and water resistant, insulated toe covers over my shoes.

6. If cared for properly, cycling clothing lasts a long time.

All this clothing is expensive. I probably have $2,000 or more in cycling clothing. But if kept clean and dry, it can take years to wear out. The most expensive pieces — Goretex and insulated — often will last for many years because they are the least used in California.

7. You get used to the odor.

Sadly, spandex has a tendency to retain odors. Its never pleasant, but its worth it for the thrill and fun of cycling. Wool retains less odor, so try wool garments, too.

I hope this helps. If so, consider donating $5 or more to my ALC ride. Click "Donate," above.

Love,
Your Bear

Over the next couple months, I'm going to write a few articles with the lead-in title "Absolute Beginners," explaining some of the basic principles of cycling. Most of the information is stuff I've learned from other cyclists, bike shop mechanics, classes I've taken, and Google searches. Please help me out and comment with corrections, additions, or supplements which will help my readers learn about how to operate their bikes!

Friday, October 18, 2013

Absolute Beginners: Handlebars and Control

On a road bike, the handlebars are the place where you rest your hands, part of the load distribution between front and rear wheels, the location of the bicycle controls for brakes and shifting, and integral to steering.

This post answers two general questions. First, why do long distance cyclists usually choose road bicycle handlebars? Second, what role do the handlebars play in controlling the bicycle?

1. Why do Long-Distance Cyclists Choose Road-bike Handlebars?

As with every other part of your bicycle, there are a number of choices you can make in handlebar style:
Figure A.1: Typical Road Bicycle Handlebars. Image Credit.
Figure A.2: Road Bicycle Handlebars with Brakes and Shifters. Image Credit.

Figure B: A more relaxed handlebar configuration. Image Credit.

Figure C: Mountain Bike Handlebars. Image Credit.
If you read the Wikipedia entry on bicycle handlebars, you will see over ten identified styles of handlebars. But as you do the ALC, you'll notice that the vast majority of riders use the type shown in Figure A.1 and A.2. As we'll explore in future posts, road bicycles provide a smaller contact to the road, give you a less-upright position, and give you the opportunity to distribute your weight relatively evenly between the handlebars and the saddle. These features exist, in part, because in road cycling, you may spend extended lengths of time in, essentially, one position.

Figure D: Parts of the Handlebars.
Handlebars are a tube of metal (or carbon fiber) intended to accommodate your hands as comfortably as possible. They're tubular and not solid to cut vibration, because tubes are lighter, and because they are stronger for this application. Some features of the road bars in order to accommodate the specific positions your body takes in road cycling are: multiple grip points, controls accessible from most of the grip points, and tape covering the entire bar. See Figure D for the names of the parts of a handlebar (not every bike will have this exact configuration).

These features provide two primary benefits for road cyclists:

  • Multiple hand placements during a ride. Allows:
    • Altered placements during long rides to avoid cramping and discomfort, generally.
    • Use of the top of the handlebar during ascents.
    • Use of the hoods during the bulk of the ride.
    • Use of the drops during descents.
    • Quick access to the brakes and shifters from each placement.
  • A neutral hand position in each placement (meaning the wrists are in line with the forearms). This puts the least amount of strain on the wrists and forearms, and should help alleviate numbness and pain.

a. The Hoods.

You'll spend most of your time with your hands engaged in the hoods. What that means is the crook between your thumb and forefinger will be pressed against the plastic portion (hood), your thumb will be crooked over the hood, and your other fingers will be wrapped around the hood and below it on the hook. In this position, you can easily open your fingers to use the brakes and shifters. Your grip should generally be firm but light (not a death grip), but should affix your hand firmly to the bar. (That way if you hit an unexpected bump, your hand doesn't fly off.)

b. The Top and the Drop.

From your standard position in the hoods, you'll move your hand — still firmly wrapped around the tube — to the top when on long ascents, to give your hand a break, or to drink from your water bottle. This position is furthest from the brake levers, so keep your eye on the road and be prepared to move to the drops if necessary.

You'll move your hand to the bottom of the hook or the drop on long descents, to give yourself a more aerodynamic seating posture, and to give your hand a rest. Riding in the drops can be challenging for new riders, so get used to it on flats or very gradual descents before trying it on steep descents. You can brake or shift from the drops, so practice that as well.

c. Neutral Wrist Position.

A primary complaint riders have is that their hands, fingers, forearms, and beyond get numb with longer rides. Part of the solution is to maintain a neutral wrist position — meaning your wrists are in the same plane as your forearms and palms.

Figure E: Not a perfect position. Image Credit and Details.
Figure E shows a cyclist with a fairly good wrist position. Notice that his palm is not flexed. But also notice that the line of his hand is bent relative to the line of his forearm. A good position, but he could do better (read the discussion for details). For a good understanding of neutral wrist position, see Figure F.

Figure F: Ideal Neutral Wrist Position. Image Credit.
I used to grow numb on long, flat rides, but not on hilly rides. For me the resolution was a bike fit. The fitter swapped out my stem and handlebars to bring the controls closer to my body and to narrow the handlebars to prevent strain on my shoulders, too. That and seat adjustments completely eliminated numbness and most soreness.

If you have a bike fit, your fitter may alter the geometry of the bars. You may get a shorter stem (the component which attaches the handlebars to the frame. You may get a tighter or shorter hook to place the drops closer to your body. You may get a narrower handlebar to keep your wrists in a neutral position. Or the fitter may simply adjust the angle of the bars to the frame.

2. What role do the Handlebars Play in Bicycle Control?

Just to state the obvious: handle bars are not a steering wheel. Bicycles are not controlled by wrenching the handlebars from side to side, but instead by more subtle movements of the body. That being said, bicycles turn the way they do because the front wheel is free to move from the plane of the rest of the bike. So, what role do handlebars play in steering?

Mainly, the handlebars are used in a maneuver called countersteering. A full discussion of countersteering will be the subject of a future blog post, but see my prior posts about cornering. The gist of countersteering is that rather than pulling your handlebars to the right to complete a right turn, you gently press on the right handlebar causing the bike to lean to the right — counter to the pressure. In cycling, however, you use your whole body to give the bike that gentle pressure to the left, rather than just the handlebar (which is somewhat different that in motorcycling).

In a future edition of Absolute Beginners I will walk you through a complete turn.

Love,
Your Bear

Over the next couple months, I'm going to write a few articles with the lead-in title "Absolute Beginners," explaining some of the basic principles of cycling. Most of the information is stuff I've learned from other cyclists, bike shop mechanics, classes I've taken, and Google searches. Please help me out and comment with corrections, additions, or supplements which will help my readers learn about how to operate their bikes!

Wednesday, October 9, 2013

Absolute Beginners: The Saddle and Seating

The first three posts in my Absolute Beginner's series are about the body-bicycle interface: pedals, saddle, handlebars. This week, I write about the saddle or seat.
Figure A. Parts of a Bicycle. Image Credit (with more detail).
Your saddle is much more than a comfy place to put your butt while enjoying the scenery. Instead, it's an integral part of how you operate the bicycle.

1. Choosing a saddle shape.

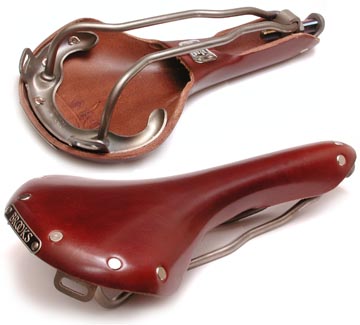
Just like nearly every other component, there is a range of saddle types, depending on the type of bike and the shape of the rider. (Here's an extensive summary of bicycle saddles and their various parts.)

Figure B1. Classic Saddle. Image Credit.
Figure B2. Touring Saddle. Image Credit.


Figure B3. Road bike Saddle. Image Credit.
Walking around cycling shops, you'll notice many different saddle shapes and sizes. New cyclists may be tempted to choose a large, broad, soft or springy model. But there's a reason why road bike saddles are shaped as they are.

When you ride long distances, a larger saddle may chafe your inner thighs and a softer saddle provides insufficient support to your sit bones — the point where your butt actually intersects with the saddle. That is why saddles have the narrowed, tapered shape and the broad backside. Here is the problem with larges, squishy saddles simply stated:

Imagine sitting down on a coffee table. Your weight is concentrated on the two bumps of your "sit bones", also known as the "ischial tuberosities." These are the parts of your body designed to bear your seated weight. Most cases of saddle-related discomfort arise because the load is carried on the soft tissues between the sit bones. 
Imagine placing a soft pillow on top of the coffee table. Now, as you sit down on it, the sit bones compress the pillow, which yields until the sit bones are almost on the table surface again. The difference is that now, you have pressure in between your sit bones from the middle part of the pillow. 
In the same way, a saddle with excessively soft, thick padding can make you less comfortable by increasing the pressure between your sit bones. 
Many cyclists are unaware of this, and many saddles are made to appeal to the purchaser who chooses a saddle on the basis of how easily the thumb can sink into the squishy top. 
This type of saddle is only comfortable for very short rides, (though an inexperienced cyclist will often find it more comfortable than a better saddle, as long as rides don't exceed a mile or two.) 
Saddles with excessive padding are also a common cause of painful chafing of the inner thigh, as rides become longer.

(Thank you Sheldon Brown.)

If you find discomfort in your butt or numbness in your privates, you may have the wrong saddle or may have other fit issues. Before spending a lot of money on a series of new saddles, I recommend you get a competent bike fit: "It's the best $300 you'll ever spend to get more comfort and power out of your trusty steed." (not the bike fit you get from a salesperson when you buy the bike).

2. The Butt's Role in Support.

As a new rider, you may have the impression that riding a bicycle means sitting on the saddle, holding on by the handlebars, and pedaling with your thighs. However, that is not the proper way to look at it.

When riding, a good rule of thumb is to start out with about 60% of your weight on the rear wheel (via your butt), 40% the front wheel (via your arms), and shifting these numbers onto the pedals to varying degrees during pedal strokes (via your thighs and legs). Most of the google references on this topic are highly technical and related to racing. But for a new rider, the issue is comfort.

If you put too much weight on your butt, you're going to chafe and you're going to dislike cycling. If you put too much weight on your arms and hands, you're going to get numb fingers and you're going to dislike cycling. Thus, what is important is to keep a healthy balance between the two, attempting to keep everything under as little stress as possible for the maximum amount of time.

3. The Butt's Role in Control.

Steering a bicycle is not as simple as grabbing the handlebars and yanking left and right. There's a full-body motion involved in each and every turn you make. Smaller turns require the more subtle motion, too. This portion of this article will require more detailed explanation, and a quick Google search did not return immediately applicable material.

As I've written before, and will again when I write my article on steering, a good turn occurs when you press on the pedal with your outside foot, inside foot high in the pedal stroke. So, one of the most important roles of the saddle in steering is providing a lever from which to generate the push on the outside foot.

Another important role is when you need to actively lean your bike into a sharp, high-speed turn. More about that in a future post.

4. Why Your Butt Hurts: Changing Saddles may not Fix it.

There are two reasons why your butt may be hurting. First, you may be getting chaffing, which leads to irritation, which leads to infection. Symptoms of this are redness, bumps, pain, swelling, and itchiness. This kind of infection is common among cyclists. Over time, you may become a bit calloused in the creases under your butt cheeks. This is nothing to be alarmed over, so long as you cure any infection before it becomes chronic.

Try using some antibiotic ointment on the infected area (I'm not sure of the efficacy of this treatment, so consult with your doctor). Your physician may prescribe lidocaine to reduce pain and inflammation. Additionally, you may try ibuprofen or acetaminophen to reduce inflammation. Also, experiment with different short materials and styles. The stitching in less-expensive shorts may not agree with your physique.

Consult with your physician if these symptoms occur frequently, persist, or become severe. Otherwise, they are, to some degree, a right of passage for cyclists.

Second, you may experience soreness in your buttocks, thighs, or hamstrings after rides. If these symptoms are bearable and reduce with continued riding, they may be simply a matter of getting used to cycling. If they become worse with time or longer rides, you may need a bike fit.

In fact, if either of these conditions persist, a bike fit might help. Subtle changes in your interface with the bike may alleviate the pressure causing chaffing or causing muscular pain. Only consultation with a professional and testing will help you know for sure.

Love,
Your Bear

Over the next couple months, I'm going to write a few articles with the lead-in title "Absolute Beginners," explaining some of the basic principles of cycling. Most of the information is stuff I've learned from other cyclists, bike shop mechanics, classes I've taken, and Google searches. Please help me out and comment with corrections, additions, or supplements which will help my readers learn about how to operate their bikes!

Sunday, September 29, 2013

Absolute Beginners: Pedals and Pedaling

Bicycles typically come with three basic types of pedals, but pedals can always be upgraded or replaced (this is usually the first upgrade most riders make). The types are:


  1. Plain or "Platform" Pedals (figure 1).
  2. Pedals with "toe clips" (figure 3).
  3. Clip-less Pedals (figures 4a–4c).
Figure 1: Platform pedals

Pedals are affixed to a crank on either side of the bike, each arm 180º from the other. The pedals are attached to the crank by a variable length arm; length determined by bike size, rider size and proportions, and type of crank installed. If you ever have a bike fit, the fitter may well replace the crank arms with longer or shorter arms to accommodate your particular mechanics (that will likely require a whole new crank, by the way, because the crank is usually built in to the front chain ring). (Figure 2.)

The pedals are one of three basic interfaces you have with your bike: the handlebars (for stability and control), the saddle (for your butt, but also for stability and control), and the pedals (for power, stability, and also for control). As you can see, all three interfaces provide control over the bike. As the Absolute Beginners series continues, I'll describe how bicycle steering is generated from the pedals and saddle as much as or more than the handlebars.

To generate power and to keep the bike upright, the rider must keep the chainring moving with the chain engaged, thus powering the rear wheel. The rider generates this power by turning the crank by means of the crank arm. In turn, the crank arm is moved by pressure on the pedals with the feet.

And the primary difference between the pedal types is the efficiency with which you move the crank arm by means of your foot: the more affixed your foot is to the pedal, the more power you get for your effort.

Figure 2: Parts of a crank. Image Credit. Click to enlarge.


1. Platform Pedals

When you first purchase your bike, its likely to be equipped with plain pedals. A rider uses platform pedals the old fashioned way: you simply place the balls of your feet on the top of the pedal and push down with the upper foot, allowing the lower foot to rise with the motion of the crank arm.

Plain pedals represent a low-end in a progression of efficiency. When you cycle with only plain pedals, you get power only when your foot is pressing down on the pedal, not during any other part of the stroke. So any effort made to move your other foot (back and forth and up in the circle representing one bicycle pedal stroke) does not go into your forward momentum.

2. Pedals with Toe Clips

"Toe clips" are cages which affix to the pedal. Special pedals are usually required to install the toe clips.
Figure 3: Toe clips. Image Credit.
Pedals with toe clips represent a step up in the progression of efficiency. They provide two main purposes: first, they position your foot roughly in the best position (ball of foot over the pedal), and second, they affix your foot more firmly to the pedal. Thus, you get power from pushing down on the pedal, pulling up on the pedal, and from the forward motion of your foot in the pedal stroke. So, with toe clips, you'll get power on 3/4 of the pedal stroke over the 1/4 with platform pedals only.

Reason tells us that if you pull your foot back during the pedal stroke, you'll pull out of the clip. Usually, your shoes will have some kind of ridges which will keep your foot on the pedal when you pull back. This final 1/4 of the pedal stroke will not provide as good an adherence to the pedal as the other 3/4. Still, this is light years better than the pedal alone.

Toe-clip pedals have several drawbacks. They are heavier than "clipless" pedals. They provide for a LOT of foot movement during the pedal stroke, decreasing efficiency. They are cumbersome to operate. They are harder to get into and out of than "clipless" pedals. And, believe it or not, they are more dangerous to operate than clipless pedals.

If you chose toe clips, remember: you cannot safely ride with your foot on the non-toeclip side! The toe clip may catch on road debris or surface features, and may cause you to crash.

3. Clipless Pedals

Yes, even though you "clip into" them and "clip out" of them, these babies are "clipless." That is because they do away with the toe clips. And these are the most efficient pedals for cycling. Your foot is fully affixed to the pedal, so you are most likely to get full efficiency out of each pedal stroke.

Here are some different types. SPD offer a smaller interface with your shoe, and are often used for mountain biking. SPD SL offers an easier clip along with a nylon cleat and are often used for road biking:

Figure 4a: Shimano SPD Clipless Pedals. Image credit.
Figure 4b: Shimano SPD SL Pedals and Road Bike Shoes. Image credit.

Figure 4c: Shimano SPD SL Cleats. Image credit.
I can't deny it, clipless pedals are intimidating. But they are also awesome. When you get them dialed-in, you and your bike become one. You are the bike. With clipless pedals comes the maximum possible efficiency. You can get power from 100% of the pedal stroke. And you can feel the difference.

Thus, you will see very few road cyclists riding with anything but clipless pedals. As you progress, you'll want to upgrade to clipless pedals for sure. In fact, most dedicated riders will skip toe clips entirely and jump right to clipless pedals.

Once you decide to take the plunge, there are many manufacturers looking for your business: Shimano, Look, Crank Bros, and Speed Play are all more-or-less common brands. Which you choose is a matter of personal choice. Ask other cyclists which they prefer — you will often find near religious adherence to a brand. Here's a useful buying guide.

You need to practice with these. Ask your sales person or training ride leader to demonstrate how to clip in and clip out. You usually get in by aligning the cleat to the edge of the pedal and pressing with the ball of your foot. You usually get out by twisting your foot and stepping off the pedal. Here's a useful video. You can search YouTube for many other similar videos.

This was a lot of information about a seemingly innocuous part of your bike. But pedals are very important and worth the time thinking about them.

Love,
Your Bear

By the way: Over the next couple months, I'm going to write a few articles with the lead-in title "Absolute Beginners," explaining some of the basic principles of cycling. Most of the information is stuff I've learned from other cyclists, bike shop mechanics, classes I've taken, and Google searches. Please help me out and comment with corrections, additions, or supplements which will help my readers learn about how to operate their bikes!

Thursday, September 26, 2013

Letter to New Riders

I just typed up a letter to a new rider, and I thought it might be useful for other AIDS/LifeCycle Training Ride Leaders. So I'm reprinting it here:

Analisa, 
I'm glad you're coming on your first training ride with us. You've come to the right place. We're here to help you get up to speed on the task at hand — learning the cycling skills you'll need to complete your first AIDS/LifeCycle. 
I cannot tell a lie: you're essentially starting out at sea-level, and you have to climb a huge mountain to achieve your goal: 7 days of cycling an average of 6 hours per day, for a total of 545 miles. But with training and some healthy tips and tricks, you can do it. (Here's my summary of a good training plan: http://bearalc.blogspot.com/search/label/Training%20Plan.) 
The things you need, include: a basic understanding of your bike, an understanding of your body's nutritional needs during a ride, and time in the saddle actually riding. 
Image Credit: The Fixed Gear.
(1) Understanding your Bike: 
Sounds like you can start, stop, and steer your bike, so you've taken the first step toward understanding how to operate your bike. As you attend more and more training rides, the Training Ride Leaders (TRLs) will be able to help you improve how you ride (for instance, teaching you how to steer, use your brakes and gears, and when and how to clean your bike). Please ask questions. 
(Here are a few posts on skills: http://bearalc.blogspot.com/search/label/Skills. I have to write a post about basic skills, I think!) 
(2) Nutrition: 
You'll learn your body's athletic nutritional needs over time. But, I can tell you that just before, during, and after training rides is not the time for a weight-loss diet. Your body needs calories, carbs, sugars, and salt to put out the athletic effort needed to finish a long ride. To that end, be sure you have a healthy meal the night before your first training ride, eat breakfast and don't skimp on the carbs. 
Make sure you have two water bottles on your first ride: one with water, and one with an electrolyte supplement. TRLs will have some spare supplements, probably, and on our nice-and-easy 20 mile ride, you shouldn't have a problem if you forget the electrolytes. 
(Take a look at my blog entry on eating: http://bearalc.blogspot.com/2012/04/eat.html (then click the label "nutrition" for more on the topic).) 
(3) Training and Time: 
Know that training for the ALC is a time commitment. At the beginning of your training (now) a couple hours per week on casual rides will suffice. However, by around the beginning of May, a good, achievable average might be about 8 to 12 hours or more per week of concentrated riding (including hills, longer rides (up to 60 miles or more), and back-to-back days of riding). There is much more to this than I can write in a short paragraph, but without this time commitment, completing the long ride can be difficult. What this means in practice is that coming to our training rides is a great start, but you'll also have to train on your own some times. 
(Why ride long distance? Here's my reasoning: http://bearalc.blogspot.com/2013/01/50-miles-you-must-be-mad.html.) 
All this being said, I want to repeat: YOU CAN DO IT. The AIDS/LifeCycle is like no other experience. From the time of your first training ride, you'll be surrounded by people who want you to succeed. The event itself is fully supported from Day 0 to Day 7. As you do the ride, you'll notice marked support cars, vans, and motorcycles driving by you. The drivers have one goal: your safety. So, even if you find yourself lacking in one area, you know you'll always make it back to camp safe and sound — having ridden every mile, or every mile that you can! 
I'm looking forward to meeting you. Don't forget to RSVP to Saturday's ride on the website: https://actnow.tofighthiv.org/site/SPageNavigator/AIDSLifeCycle/ALC_Calendar. Also, don't forget to join our Facebook page for more encouragement. tips and tricks, and to meet other riders and roadies (https://www.facebook.com/SacramentoAlcTrainingRides).
Regards,
Bear
Please feel free to use this letter as is or modified.

Love,
Your Bear

Monday, May 13, 2013

Low and Slow

Be patient and kind. Not everyone has the same skills as you when it comes to riding a bike.
These are the words that begin every AIDS/LifeCycle training ride and will begin the ALC itself (follow this link for information about Orientation Day). And for some of us, it may seem a cruel fact that even as we have been progressing on the training rides, so too have our friends, leaving us continually at the back. Here's some advice (after you've followed your physician's advice) to help you keep up with the pack.

  1. You can do it. Individuals with your skills have done nearly every training ride on the agenda; you can too.
  2. Stay hydrated and fed. So often cycling performance is a matter of nutrition — this goes for new riders and experienced riders. I give this advice from personal knowledge!
  3. Get a route sheet and learn how to read it. Timidity in the route and relying on training ride leaders for direction will slow you down unnecessarily.
  4. Be the first out. Pair yourself up with a fast rider who knows the route. You'll find that person not diddling with their gloves at t-minus 5 minutes, but helmet on and ready to go. Get on the road before that person.
  5. Pass other riders. Unless they need assistance (ask), don't slow down because a group of riders is in front of you. Go ahead and pass them (safely).
  6. Be comfortable in groups. The rules say, "one bike length between the rider in front of you." Try to make that a maximum, not just a minimum.
  7. Miss the stop lights. Lagging behind to avoid the melee will make you hit stop lights you might otherwise have missed. This artificially makes you feel slower.
  8. Keep up at the beginning of the ride. You're still fresh, try to minimize the distance between you and the riders in front of you.
  9. Know your gearing. Make sure you're in the right gear at the right time to avoid slow starts.
  10. Rest quickly at rest stops. And avoid stopping between rest stops. Staying at a rest stop for too long will only tire you out. When you're exercising, your body is burning calories even at rest. Use those calories to your benefit and be the first out of the rest stop. Plus, in hot weather you sweat more when you stop than while cycling.
  11. You're closer than you think. Often (not always), you're not as far behind the rider in front as you think. If you'd been behind them for a while, they're probably wondering where you are. Try to catch them; they might be waiting for you!
I have lots more advice — get a riding buddy, avoid stopping on hills, know your strengths and use them to catch up, ask for advice, read up on cycling, if pain is a problem then seek a bike fit — and I've blogged on most of these topics. But the last secret is:
Everyone is tired by the end of a long ride. You can use that to your advantage if you stay on track, regroup with your mates at rest stops and regroup points, and stay hydrated!
Everyone on the ALC and other riders want to see you succeed. Even when it seems they don't. Remember, everyone is battling their own dragons, too!

Love,
Your Bear

PS: As my friend Terri Meier says:
As someone who hears "on your left" far more than she says it, my bit of advice is to push yourself where the going is easy, and be gentle with yourself when the terrain gets tough. Going all out on the uphills can burn you out fast, but when the road is flat, put a little extra heat on, and work to increase your comfort and skill with faster speeds on the downhills. But ultimately, don't try to "keep up" at the expense of your body, mind and spirit. There is joy to be found in meeting new friends, and even solitary meditation while on the road.

Monday, May 6, 2013

The Perfect Ride

A friend called cycling "a cult" today on Facebook. I said, "no, no, its not a cult, its a drug!" And its like a drug in that its addictive, you want to sell it to your friends, and if you miss a day you totally feel it. The difference, of course, is that cycling can do little but improve your life. This weekend many of my friends were out riding for fun or commuting, training for the AIDS/LifeCycle and just riding in events and on their own for fun and recreation.

For instance: my boyfriend rode 7 miles to a party from our house; another friend rode 30 miles on the American River Bike Trail; my training buddies and I rode 100 miles in the Wine Country Century — after a two hour car commute; other ALC mates rode 125 miles on Saturday near their hometown; and the luckiest rode 200+ miles for a full weekend of cycling in totally different counties. The thing about it is, they all report the same thing: "that was the perfect ride."

Not to say that there aren't problems. From time to time, all cyclists have troubles and doubts. But few committed cyclists fail to solve them and move on. I've blogged about these in the past:
Image from http://ryansdream.com.

  1. Mechanical issues. If you want a great ride, you have to learn to change a flat and when to take your bike in for service. (Or when to learn how to service it yourself!)
  2. Safety issues. Riding without a helmet, in the wrong lane, and disobeying traffic laws is a sure path toward organ donor-ship.
  3. Skill issues. "Am I doing this right?" "Can my bike handle that descent?" "Can my body handle that climb?"
  4. Time issues. Distance riding takes a big bite out of every weekend.
  5. Self-consiciousness issues. There are always riders better than you.
Oh, and weather! Saturday the temperature averaged 90º under the hot sun in most of Northern California. But on Sunday, the temperature plummeted and it rained in the coastal counties. A smart cyclist is prepared for these things!

Cycling is one of the few sports you can accomplish despite the weather, leaving from your front door or starting hundreds of miles away, alone or with friends, recreationally or with a purpose. Every mile ridden is a mile you weren't driving! And because you're not in a car, every ride is a perfect ride! So keep up the good work and don't let the doubts be a barrier!

Love,
Your Bear

Monday, April 29, 2013

Dragonslayer

This weekend was a milestone for my AIDS/LifeCycle training. As I've been preaching to my trainees, Jon Walker, Matthew Bokach, and I rode two challenging, back-to-back rides. On Saturday, we rode on the 65 mile 2013 Day on the Ride — a practice day for the ALC. Then on Sunday, we rode in the Chico Velo Wildflower Century, specifically on a new route: the Wildcat 100, combining the toughest hills from both the regular Wildflower and the Wildcat 125.

A. Wherein we Seek Out the Dragons.

Saturday's Day on the Ride included 65 miles, 3360 feet of climbing, and burning about 4003 calories. Sunday's Wildcat 100 included 109.4 miles, 7531 feet of climbing, and burning about 6902 calories. For a total of 173.4 miles, 10,891 feet of climbing, and 10,905 calories burned! We all rode every mile of both rides, and deserve to be proud of our achievement.

The weekend was fraught with challenges. The goal itself was hard enough: Stay with my friend John Hollwedel in San Francisco Friday night. Complete Saturday's ride in San Francisco. Repack everything in the Sports Basement parking lot. Drive from San Franciso to the Chico area (about a 3 hour drive). Complete Sunday's ride in Chico. Drive back to Sacramento
by a reasonable hour. By and large that is how it went. But, as every cyclist knows, the dragons can come out to have their way with you.

B. Wherein the Dragons Finally Show Themselves.

This weekend the dragons came out in two ways. The first was, because of our hurried packing in the parking lot, one of us lost his wallet — discovered only after we had driven over the Golden Gate Bridge back north on the road to Chico. That required a drive back over the bridge for a search, which turned up nothing, sadly.

I dreamt last night that Davey and I drove over a cliff.
While in free fall, I noticed we were both sleeping.
I forced myself awake and shook him awake.
He promptly began screaming. He was in the driver's seat,
but I knew that I had to take control of the car before I really
woke up. Somehow, I managed to pull the car out of free fall
and we started to fly. When Davey stopped screaming,
I knew I could wake up. And I did.
Despite the loss, we persevered and drove to pick up Matthew (who had driven separately) in Davis. Showering made us all feel better for the remaining drive and the fretting over the lost wallet was lost in the joy of what we were doing.

Then to Chico. Our hotel in Oroville was definitely sketchy. Peeling wallpaper over a large hole in the wall, an impromptu barbecue at 10:30 p.m. in the parking lot attended by what appeared to be drunken flunkies. But none of that bothered us. We got into bed early and slept until 5.

The real test of our mettle came on the Wildcat 100. The ride started out as a typical one. Registration, a hurried breakfast, and out on the road by 6:30. But, as a portent of things to come, the organizers had run out of the "blue" route sheets describing the ride we were about to go on. "100 miles," we thought, "we won't need a route sheet!" At that point, I really didn't know how much climbing there would be or how hot it can get during a Chico April.

Perhaps I should have been better prepared, but on most organized rides, the organizers provide most of what you need: food, water, electrolyte drink, and directions. The food may not always be good, but it is usually plentiful.

But, apparently, the Wildcat 100 was a new route for this group. Thus, they had no idea how long it would take for the participants to make it to rest stops.

The first 48 miles were epic. Cool and shady, the climb to 3300 feet was stunning and challenging. The rest stop at the top was shared with riders doing the Wildcat 125 route (which, though longer, appears to have been an easier route). By that point we were relaxed and confident and relatively well fed — oddly, the first rest stop only had cookies and fruit as snacks, while the second had the same plus some bars. Neither stop had electrolyte drink.

Though that was not enough food for me, I ate what I could and even stashed a couple bars in my pocket. We went on, feeling good and ready for lunch. The time was only about 11:30, so we weren't worried about finishing.

C. Wherein I Confront my Dragon.

I can still remember the moment when I started to worry.

At about mile 66 after a sustained 10 mile descent, our route rejoined the regular century. There was confusing route markings, so I stopped to wait for Jon and Matthew. I waited nearly 15 minutes, believing they were right behind me and lunch was right in front of me (I understood that there would be a lunch stop at mile 78 — strangely far into the ride, but not as strange as reality).

I waited and waited and many many riders passed me. It got hot and my hunger made me realize it was time to continue without them. I rode on, and on, and on in the hot sun with my lukewarm water and nothing to eat. The road was beautiful, green fields turning California gold on both side, and no one anywhere near me.

This is where I met my dragon.

The road is long. "Am I on the right road? I followed the blue markers and this is where they led. I know I'm in the right place, I just wish that Jon and Matthew had caught up with me. Had I missed something? Was one of the injured or plagued by mechanical problems?" The questions kept coming, but with no way to answer them (and no cell signal), I had no choice but to continue on.

I finally got to the rest stop at mile 78, only to learn that all the food was gone and the roadies were packing up. Hot. Dry. Confused and irritated. I ate the bars I had brought and drank half a bottle of juice left over from the food that had been there — fortunately it was very cold — and refilled my water bottles. I waited there for another 15 minutes for Jon and Matthew, but they never appeared. So, still very hungry, I got back on the road.

But a little intuition told me to wait at the entrance to the rest stop for Jon and Matthew. I did and only about 5 minutes later they appeared. I was very relieved and — with only 22 miles left to go, ready for the challenge. The time was about 2:30 p.m., so I figured we could complete those miles in only a little over an hour. Wrong!

The climb up Table Mountain took at least an hour, and the descent (despite the sign which said "its all down hill from here" and some killer down hills) was gentle rollers and some tiring flat stretches which took over an hour.

It took two and a half hours to complete the ride from where I rejoined Jon and Matthew in part because the distance was not 22 miles, but was 31 miles — a distance which typically takes me under 2 hours, but with the very steep ascent and the heat dragged on.

D. Wherein I Slay my Dragon.

That is where I slew the dragon.

I made it to the top of Table Mountain without stopping and running on empty. I was very pleased with that effort and it seemed my frustration and mental suffering internalized and turned into a Zen-like peace. I felt comfortable with the heat and my now painful butt. I felt like I was invincible.

The dragon had me in its jaws, but I didn't care. I just smiled at it, holding it at arms length. "I'm here. I'm nowhere near any permanent physical ailment. I've trained for this and I can do this." So, though I didn't have much more than that — and still hadn't eaten enough food — I knew I could finish. It was that feeling which carried me though.

We continued on along the amazingly beautiful top of Table Mountain — reminiscent of the Shire — chatting and with renewed confidence. We descended down past the now-closed mile 90 ersatz lunch stop (really? mile 90?). We continued on and on and on. In the sun, the flats which led back to the start point were far more difficult than they should have been.

Finally, we hit mile 100. Mile 100 occurred just above Highway 70 near a town called Durham. Its a great spot, because it is surrounded by fields and you can see in all directions for at least 5 miles. And one thing I could see is that there was no buidlings for at least 5 miles in the direction we were traveling. No buildings means no end point. No end point means that the ride was longer than 100 miles. And at 100 miles, your brain starts to count each tenth.

100.1. 100.2 ... 101.3.... 102... The count went on and with each passing 10th, I had to force myself not to freak out. I fantasized about it, though. I fantasized about telling off the ride organizers for planning a route with no useful rest stops. I fantasized about a Big Mac (which I never got). I fantasized about laying in the road weeping. I fantasized about a truck hitting me and running me into the gutter, never to be found again.

What helped? Only one thing: riding. I kept pedaling. I sipped my water slowly so as not to use it all up. I at the last morsel from my pocket (a pack of Honey Stingers — thanks Matthew). And I kept riding. A few riders passed me, and as I inquired about how much further we had to go, they could only give me helpless looks.

Then, finally, at mile 109.4 I arrived at the end point. The time was 5:04 p.m. and I was going to eat if I had to force one of the organizers to drive me to a restaurant. Jon and Matthew arrived a few minutes later and observed that dinner must not have ended because Bear wasn't screaming. They were right, of course, I probably would have been banned for life from the event if there had been no more food.

Fortunately, there was and it was good. I was the sort of hungry you get when you're beyond hungry. So I could only eat a small amount compared to the number of calories I had just burned. Pulled pork, tofu, noodles, and salad. It was so good, I can barely describe it. I sat alone and shoveled the food in until the plate was nearly clean.

When Jon and Matthew sat down, we bonded over the experience, compared out dragons, and laughed.

It was one of the best rides of my life. Thanks dragons.

Love,
Your Bear